Pi-hole is a Linux network-level advertisement and Internet tracker blocking application which acts as a DNS sinkhole and optionally a DHCP server, intended for use on a private network. It is designed for low-power embedded devices with network capability, such as the Raspberry Pi, but can be installed on almost any Linux machine. In my case primarily use it for protecting environment from ads, spam, malware and other sites I want people to avoid. I use an internal DNS server for actual internal queries, so also to forward PI-hole queries to those servers for appropriate internal resolution.
Step 1: Reference
The actual Pi-hole site has good documentaiton on integration of PI-hole and various OS’s. See: https://docs.pi-hole.net/main/basic-install/
In my case as most of the components are redundant, deployed two PI-hole servers behind a Loadbalancer for redundancy and throughput.
Step 2: Basic Installation
Deploy a Debian OS and perform the following steps to deploy Pi-hole:
# curl -sSL https://install.pi-hole.net | bash
Step 2: Firewall/Ports
Update your firewall to include the specific Pi-hole ports, my case NFtables inbound rules, edit /etc/nftables.conf
# Pi-hole accept https
tcp dport { 443 } accept

# Pi-hole accept DNS/tcp_udp on all interface
udp dport { 53 } accept
tcp dport { 53 } accept
Step 3: Pi-hole SSL
In most cases practical to exchange the Pi-hole administrative instance with signed certificates. Create a specific SSL directory for these certficiates and place the CA and Certificate Chain in there. Reference: https://discourse.pi-hole.net/t/enabling-https-for-your-pi-hole-web-interface/5771
# mkdir /etc/lighttpd/ssl
# cp yourtcombined-cert.pem /etc/lighttpd/ssl/combined.pem
# cp ca-chain-cert.pem /etc/lighttpd/ssl/chain.pem
# chown www-data:www-data /etc/lighttpd/ssl/*.pem
Create a new external configuration file /etc/lighttpd/external.conf as this will not get overwritten when running a Pi-hole update. and place the following details in it:
# Ensure the Pi-hole Block Page knows that this is not a blocked domain
setenv.add-environment = ("fqdn" => "true")

# Enable the SSL engine with a LE cert, only for this specific host
$SERVER["socket"] == ":443" {
  ssl.engine = "enable"
  ssl.pemfile = "/etc/lighttpd/ssl/combined.pem"
  ssl.ca-file =  "/etc/lighttpd/ssl/chain.pem"
  ssl.honor-cipher-order = "enable"
  ssl.cipher-list = "EECDH+AESGCM:EDH+AESGCM:AES256+EECDH:AES256+EDH"
  ssl.use-sslv2 = "disable"
  ssl.use-sslv3 = "disable"
}

# Redirect HTTP to HTTPS
$HTTP["scheme"] == "http" {
  $HTTP["host"] =~ ".*" {
    url.redirect = (".*" => "https://%0$0")
  }
}
Restart the lighttpd service:
# systemctl restart lighttpd
Step 4: Pi-hole Customization
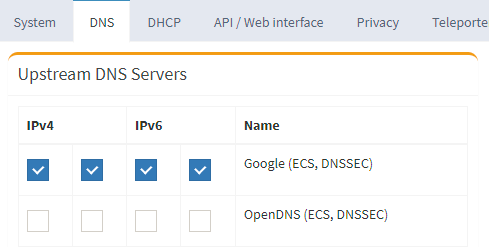
PI-hole needs to be defined where to actually query its DNS records from the internet, in my case i use both IPv4 and IPv6 and forward most of my queries with DNSSEC support to the google DNS servers. This setting can be configured on the administrative UI → Settings → DNS
Step 5: Pi-hole DNSmasq Forwarding
If you need to forward the internal domains and reverse lookups to the internal DNS servers create an additional configuration file for DNSMasq for example/etc/dnsmasq.d/02-mydomain.conf and add the following details:
# --------------------------------------
# Internal DNS forwarding information
# --------------------------------------
server=/mydomain.local/192.168.0.100
server=/mydomain.local/192.168.0.101
server=/168.192.in-addr.arpa/192.168.0.100
server=/168.192.in-addr.arpa/192.168.0.101
server=/16.172.in-addr.arpa/192.168.0.100
server=/16.172.in-addr.arpa/192.168.0.101
server=/10.in-addr.arpa/192.168.0.100
server=/10.in-addr.arpa/192.168.0.101
Step 6: Pi-hole DNSmasq Limits
In larger setups might be required to increase the DNSmasq limits to something more realistic. Create an additional configuration file for DNSMasq for example/etc/dnsmasq.d/02-custom-settings.conf and add the following details:
#### EDIT SETTINGS
dns-forward-max=5096
min-cache-ttl=300
rebind-domain-ok=
#### END EDIT
dns-forward-maxthis increases the max DNS forward limit, for busy internal network . Default limit is 150…. 1024+ is more realistic.
min-cache-ttl This extends the minimum time-to-live settings for cached lookups and ensures all DNS lookups will be cached for at least 300 seconds. This is a very useful setting to take full advantage of caching nameserver capabilities.
rebind-domain-ok= allows specific domains where DNS rebind support is needed.
Step 7: Restart
Restart the debian server so that all configuration settings take hold.
# init 6
Step 8: Pi-hole Configuration Sync
Use Pi-hole gravity-sync to synchronize configuration between Pi-hole appliances, visit https://github.com/vmstan/gravity-sync for more details, or use https://linuxize.com/post/how-to-setup-passwordless-ssh-login/ for more installation and configuration details.